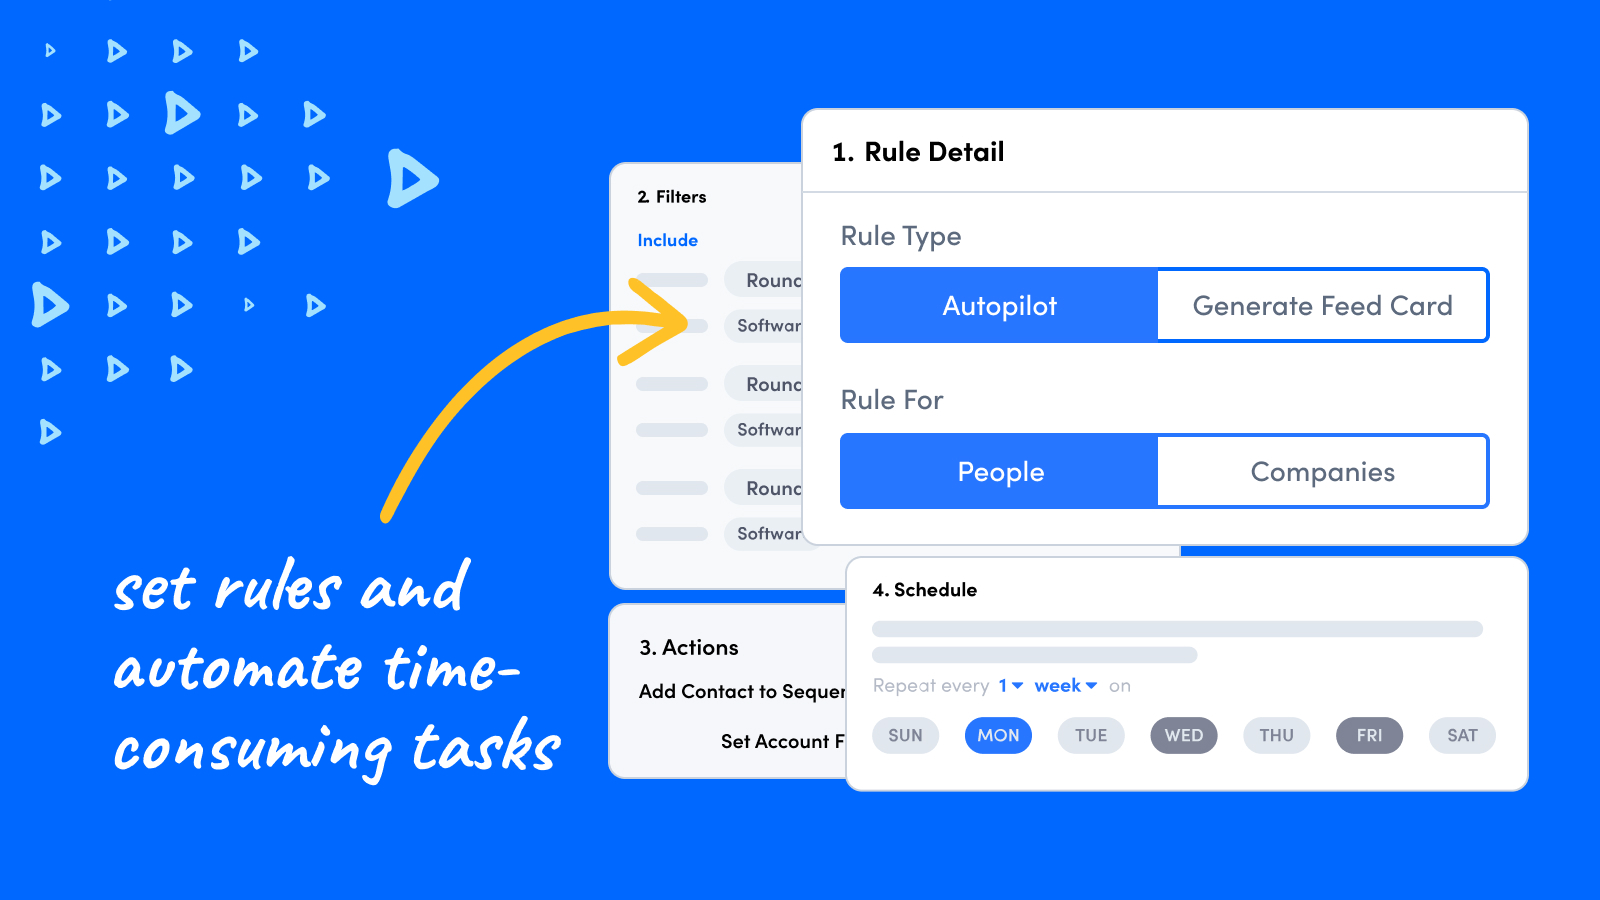
Smart, time-saving tools are the keys to unlocking sales success in today’s competitive marketplace.
This is why you can’t afford to overlook Apollo’s Rules Engine, a game-changing feature that allows you to automate outbound messaging and engagement across all of your accounts. Apollo’s Rules Engine has the power to free up sales reps from administrative tasks and do what they do best: build relationships, close deals, and drive revenue.
Keep reading and learn more about Rules Engine, how to create and configure rules in Apollo, and best practices for using Rules Engine to build unstoppable automated engagement!
What is Rules Engine?
Rules Engine is a powerful automation tool that helps Apollo users carry out dozens of actions that would otherwise require manual input.
In Rules Engine, you can create custom, automated rules that are based on an event or on a recurring schedule, depending on the ‘Rule Type’ selected:
- The ‘triggered’ rule type: This is a rule that takes place after specific events. Let’s say, for example, your sales team’s practice is to send out a follow-up email after a no-response call. A triggered rule allows you to set a “no-response call” as a trigger to send out a fully automated follow-up email. Possible triggers could also include: when an account is created or updated, when an email is sent or unsubscribed, when a call is logged, etc. But we’ll get into that more later…
- The ‘batched’ rule type: This rule type runs on a specific, set schedule that’s decided by the user. A great use case for a ‘batched’ rule would be a user who wants to send out an email to newly-added clients on the first Friday of the month to highlight some spotlight features. A ‘batched’ rule type is a perfect way to automate this process.
Why is it important?
Every day sales reps spend their valuable time updating account information, researching account activity, manually writing emails, bouncing between sales and data tools, and other tedious, manual tasks. In fact, studies show about 65% of sales reps’ time is spent on non-revenue-generating activities!
Businesses need a more fluid, effective sales process. When you add Rules Engine into your workflow, you can:
- Automate engagement and free up important time for human-to-human interaction.
- Fully standardize your sales process across your organization to ensure every customer interaction is of the highest quality.
- Limit the mistakes that often come with manual engagement and data entry.
- Respond quickly and effectively to account and contact activity with the right message at the right time.
- Increase organizational transparency for smoother workflows.
Rules Engine allows for almost limitless automation. Clever rules usage can increase a single seller’s, or an entire team’s, efficiency greatly!
Keep reading to see how easy it is to get started and to learn some killer Rules Engine best practices.
Getting started with Rules Engine
Getting started with Rules Engine is simple.
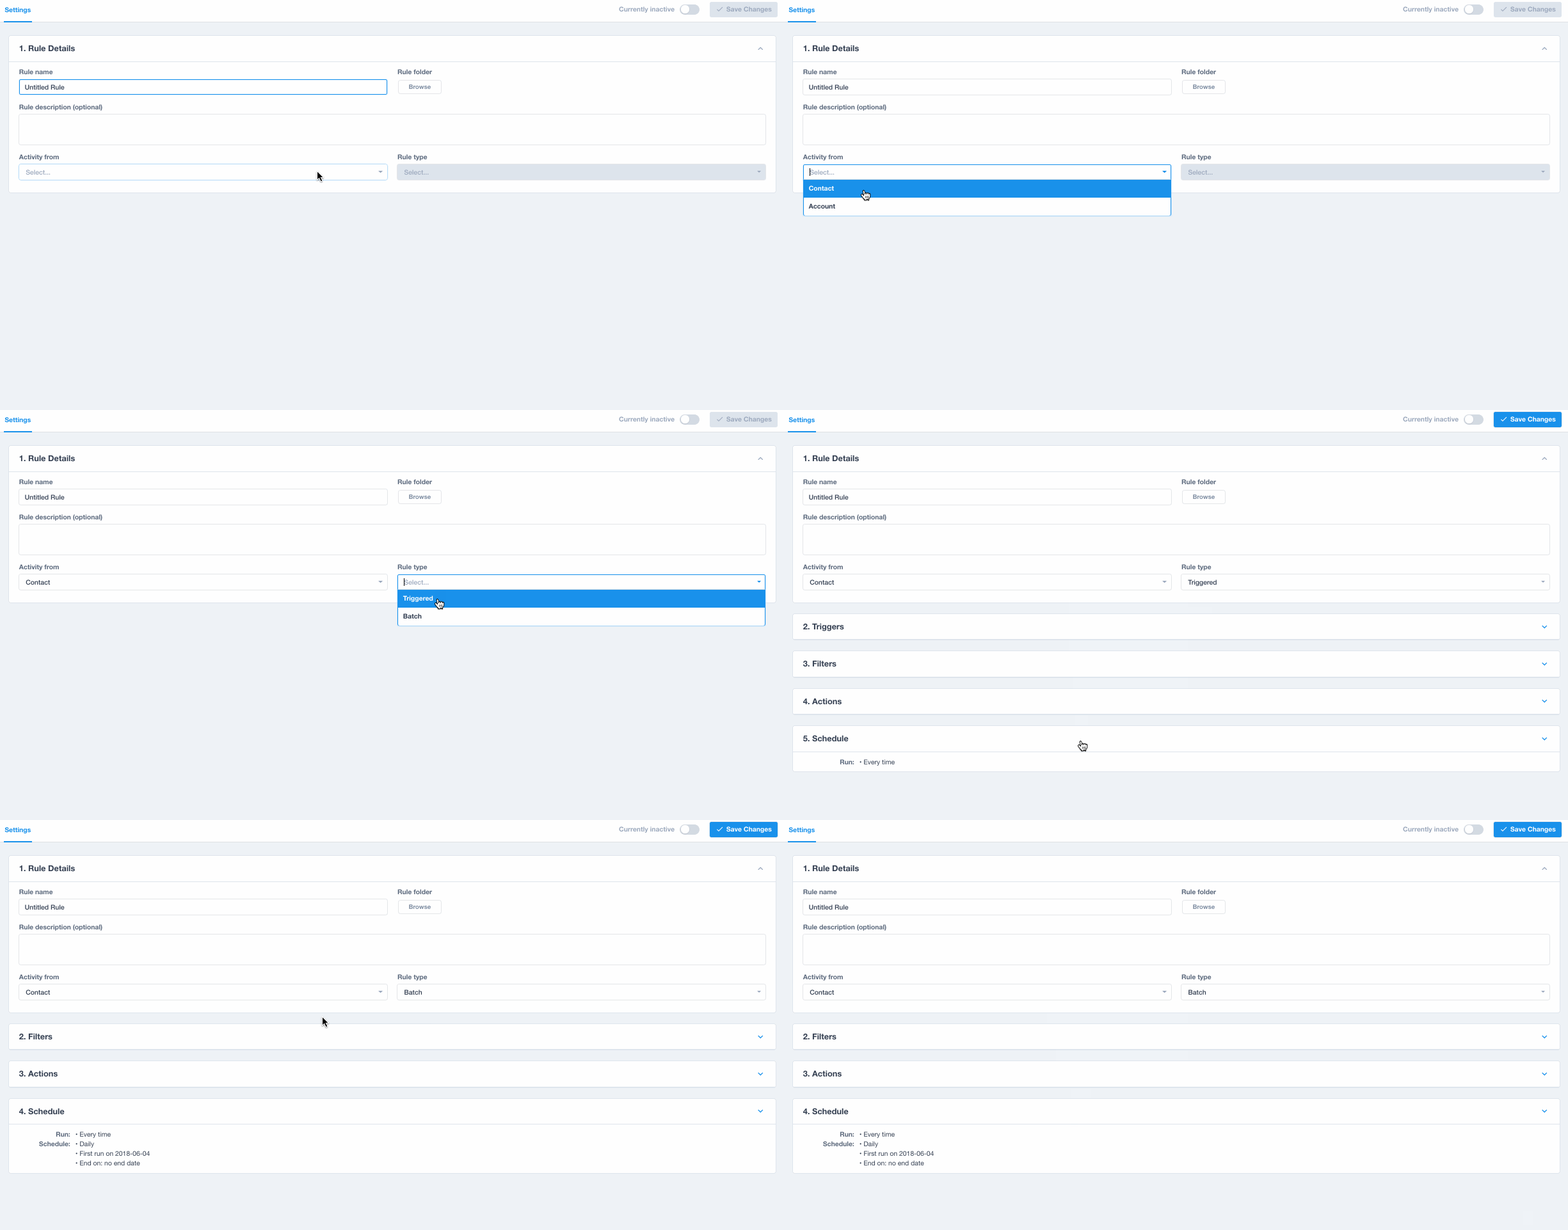
First, navigate to Settings > Rules Engine in the left-hand main menu. Then click the blue New Rule button.
From here, you’ll be taken to the Rule Details modal where you’ll name your rule, add rule descriptions, and describe which folder it can be found in.
After that, you will need to determine two primary settings:
- Whether the Rule is referencing activity from Contacts or Accounts
- Whether the ‘Rule Type’ is triggered or batched (as discussed above)
If you’re creating a ‘triggered’ rule type, it’s time to decide on your triggers (aka the specific actions that will cause your rule to run).
Possible triggers include:
- Account created/updated
- Contact created/updated
- Contact added to a sequence
- Contact did first step of a sequence
- Contact finished sequence
- Email sent/not sent
- Email replied, unsubscribed, opened, or clicked
- Call logged
All triggers except for ‘Contact Created’ and ‘Account Created’ allow you to further specify your parameters, so be sure to configure these as well. For example, the ‘Contact Updated’ trigger allows you to choose which specific contact fields (and updates) activate the rule.
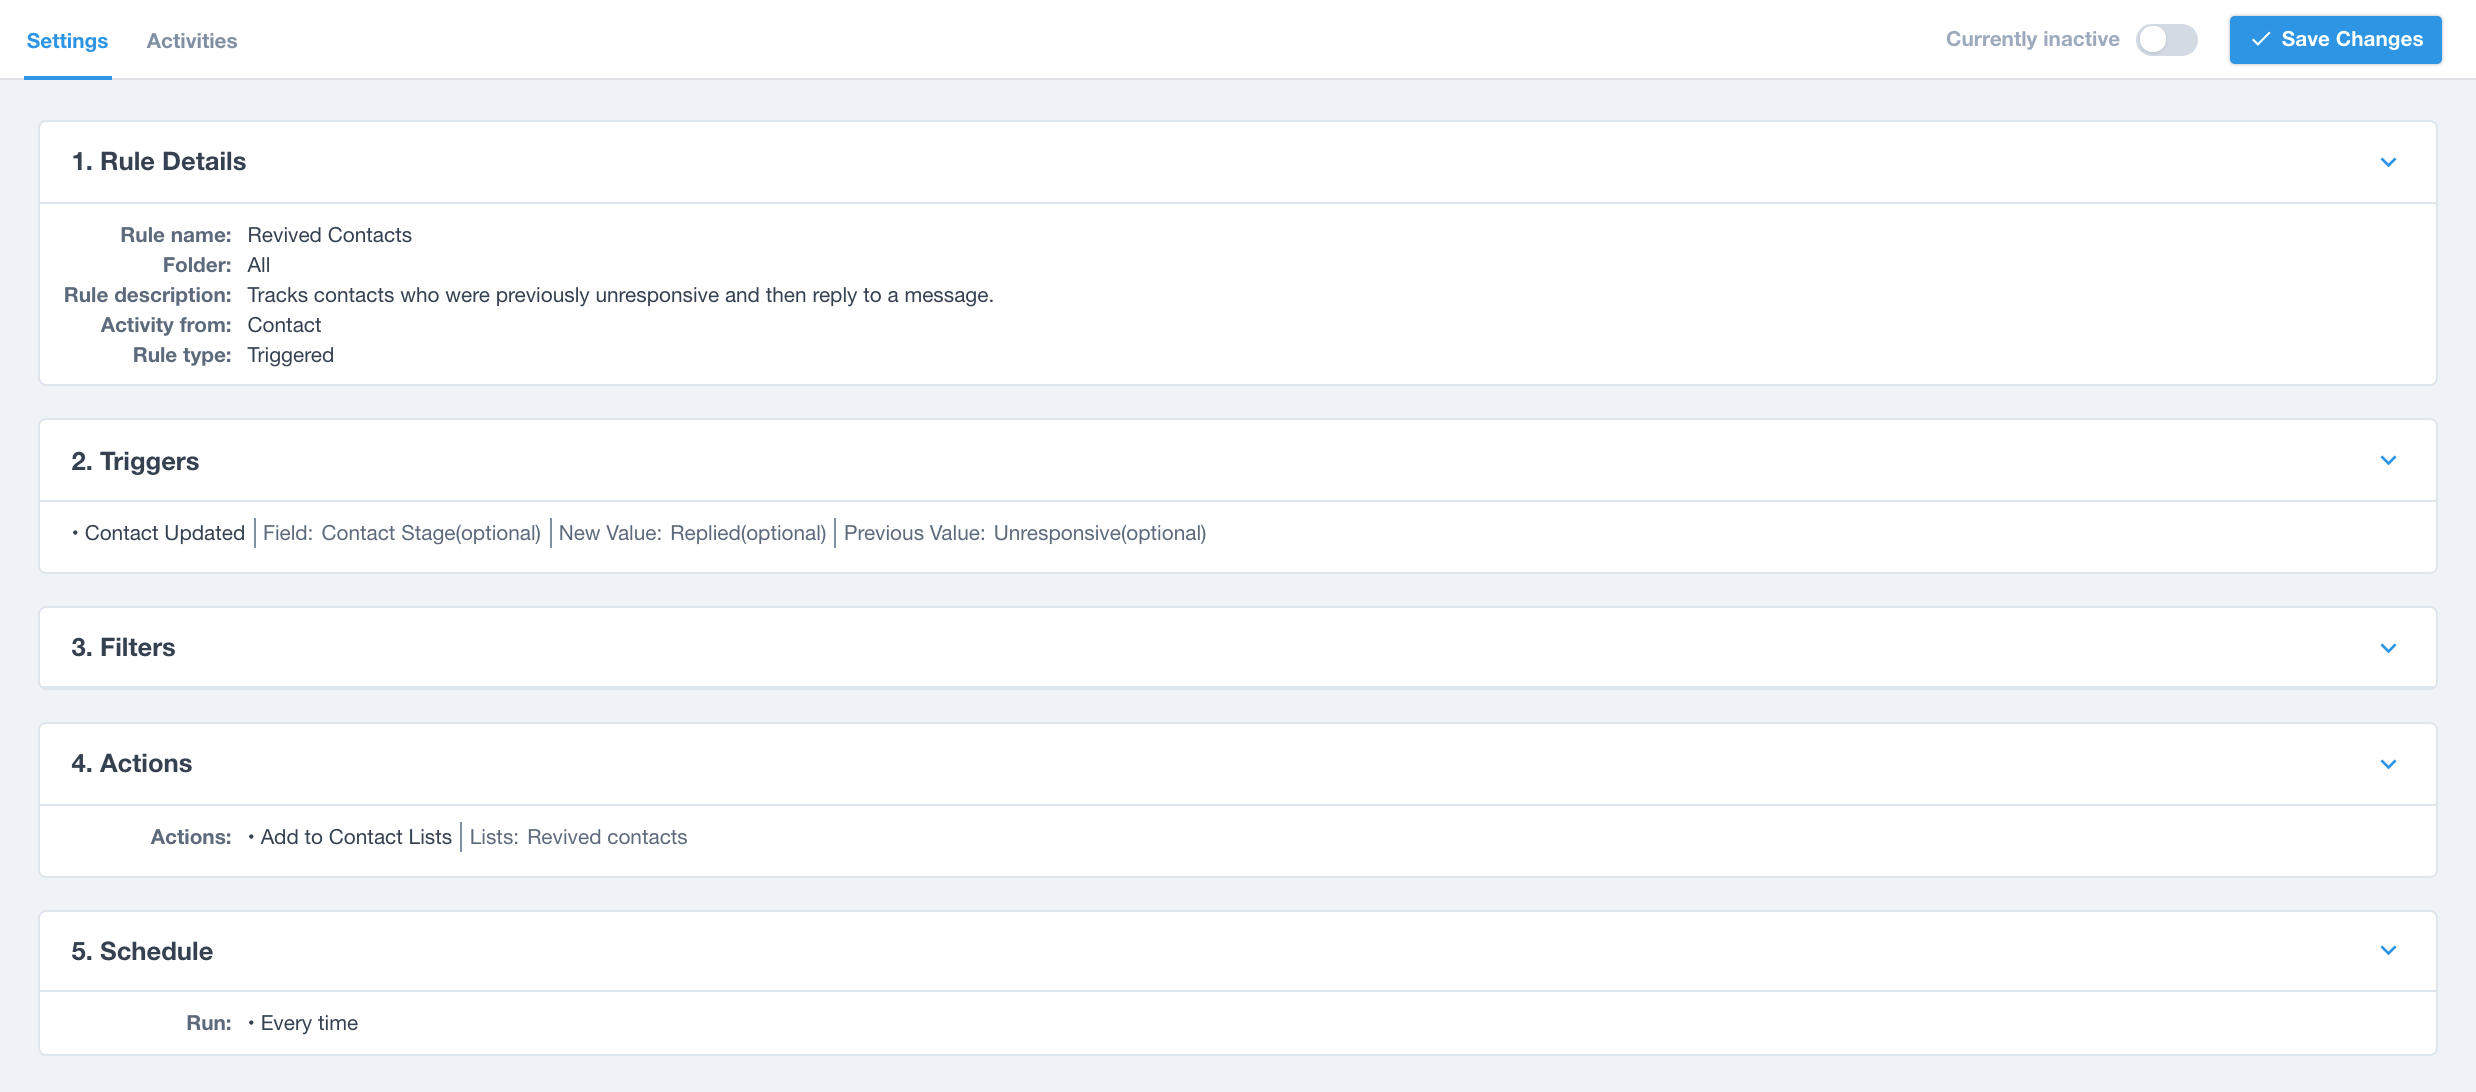
For example, the screen below shows a trigger that will automate some action whenever contacts have their stage updated from ‘Unresponsive’ to ‘Replied’:

Note: You can add as many Triggers as you like, but keep in mind that they are not additive. This means that if you have two or more triggers in a rule, your rule will run whenever any of those triggers are satisfied.
Once you determine your triggers, you need to decide on your actions (aka what the rule does for you in Apollo).
Some possible actions are:
- Wait
- Set contact/account field
- Add or remove from contact/account lists
- Add contact to sequence
- Finish contact sequences
- Create contact/account task
With your triggers and actions set, you’re one step closer to some awesome engagement automation. Here is an example of a rule that would add contacts to a ‘Revived contacts’ list whenever their stage is changed from ‘unresponsive’ to ‘replied’:
Lastly, it’s time to put your rules on a schedule.
For ‘triggered’ rules, you’ll have to set your “qualification rules”. This will prevent your contacts and accounts from getting put through the rule more times than you want.

For ‘batched’ rules, the scheduling is especially important because it determines exactly when your rule will run. In addition to the “qualification rules”, you need to decide the rule schedule, the start and end dates, and repeat settings.

Create efficient automation in Rules Engine with these best practices
#1: Engage more precisely with your buyers using Filters
When you create a rule, you can select what types of attributes your contacts or accounts must have for the rule to run. Filters are optional when your ‘Rule Type’ is triggered, but the more granular you can get with your automated rules, the better!
All of the same filters shown on the in-app searcher for Contacts, and Accounts also appear in the Rules Engine filters section. This includes filters such as:
- Contact/Account engagement and custom fields
- Contact/Account stages and lists
- Title
- Personas
- Email and phone numbers
- Job postings
- Technologies Used
- # of employees
- Industry
- Keywords
- And more!
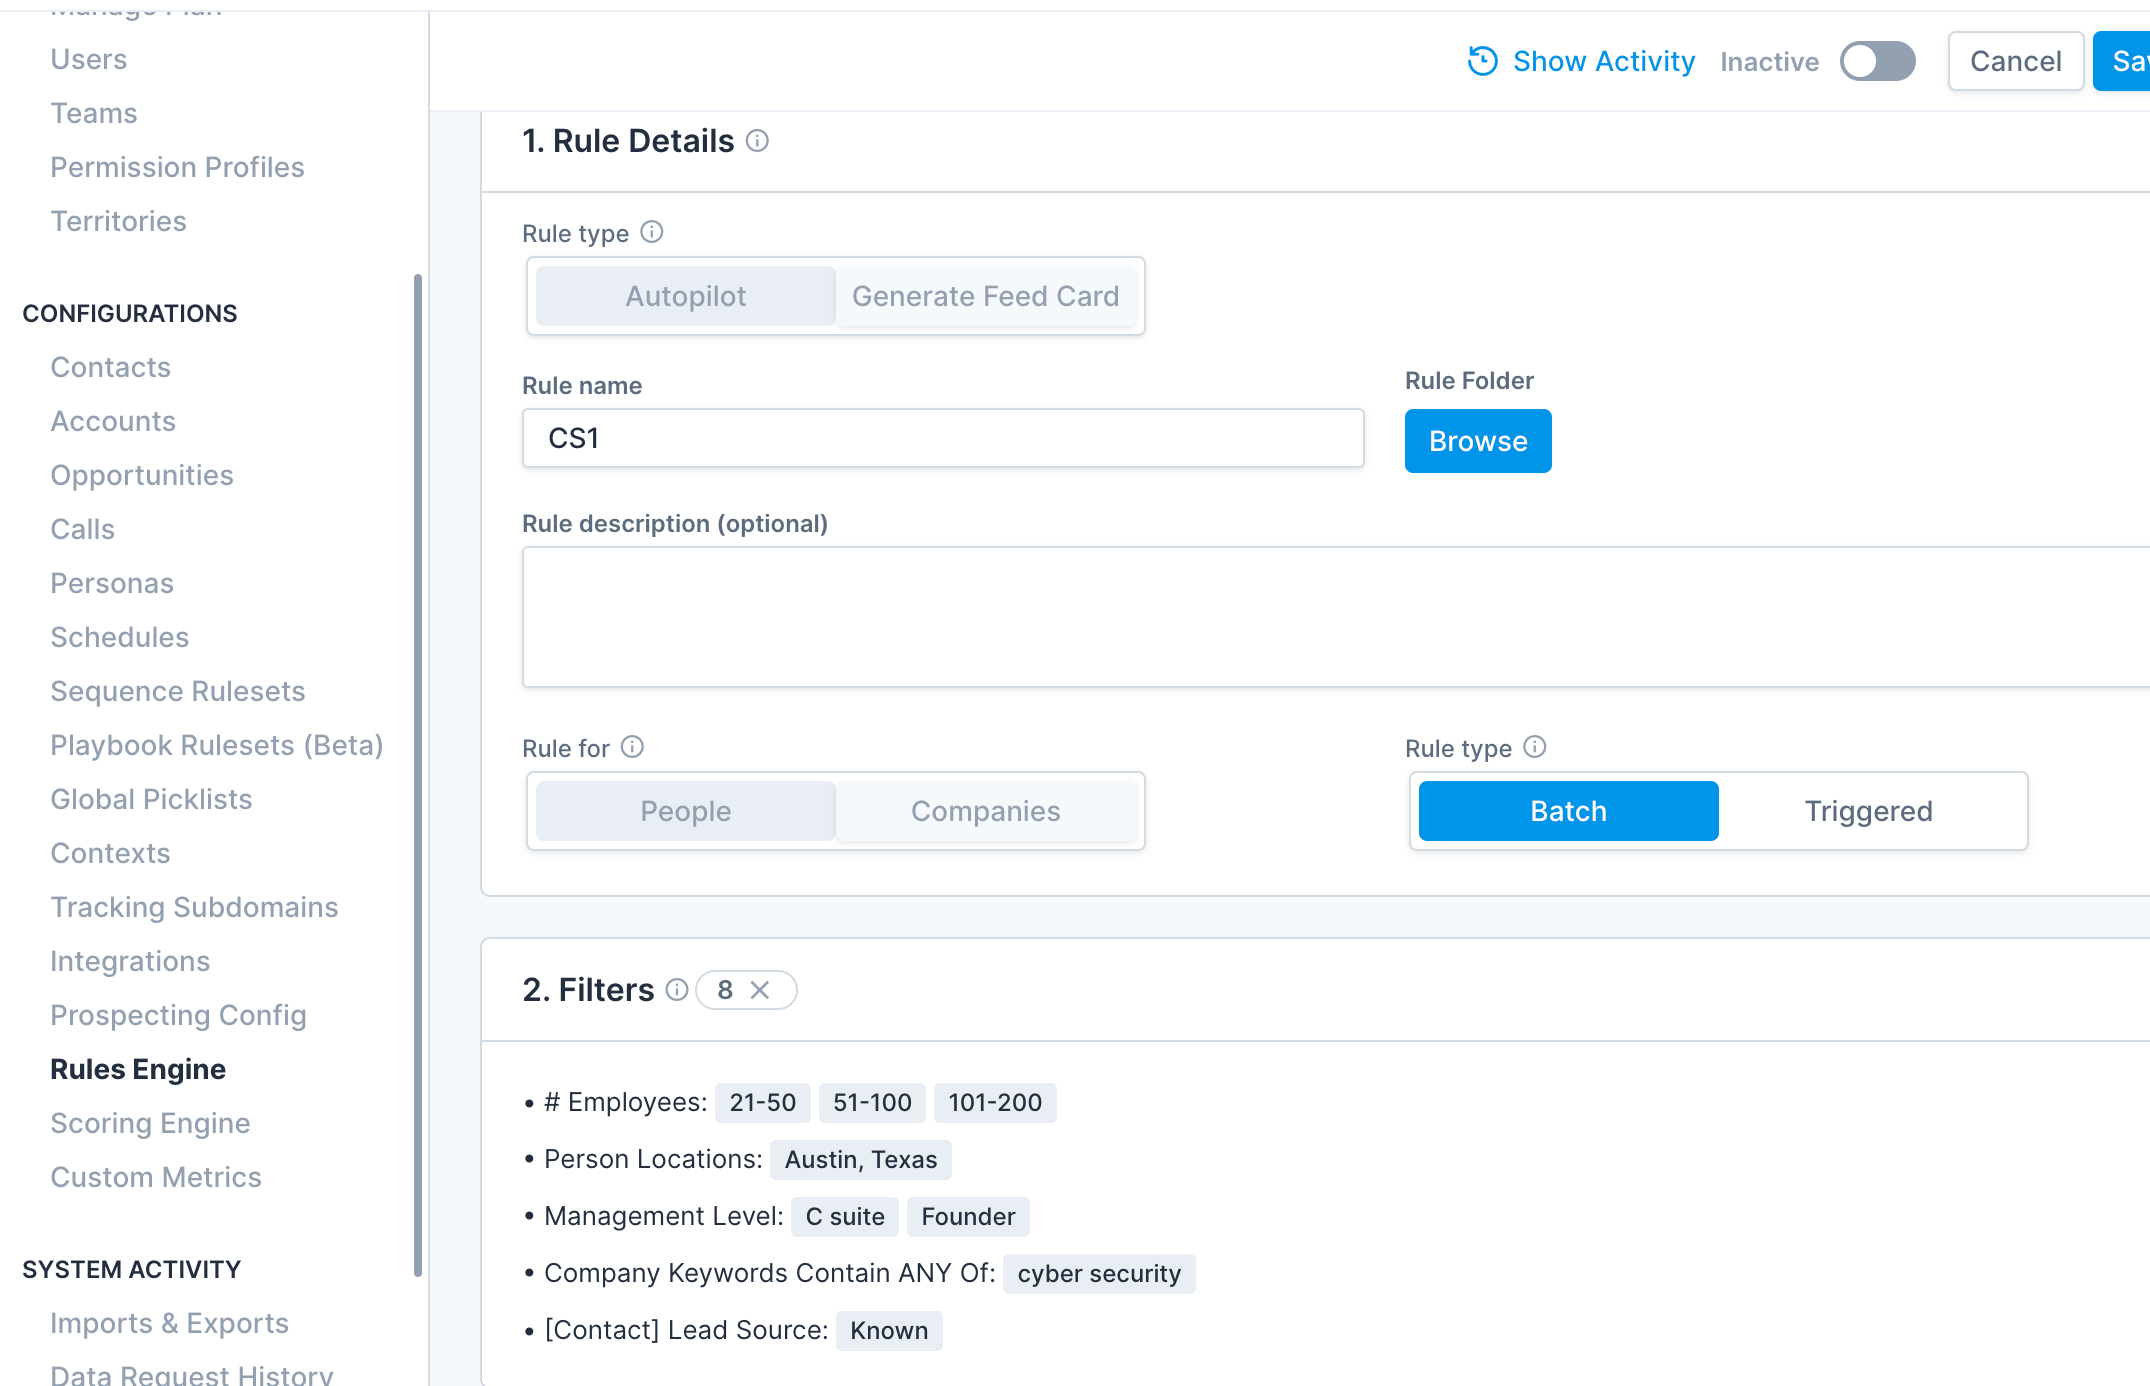
Let’s say, for example, you wanted a rule to target C-suite employees and founders based in Austin at a smaller-sized cyber security company, pulling from your known leads. Here’s an example of a filtered rule you could create in Apollo:
With Rules Engine, setting up a granular automation machine is really that simple!
#2: Automatically generate tasks for sales reps
Did you know Rules Engine can automatically create tasks for sales reps?
With the right setup, a rule can generate contact and/or account tasks for manual actions like phone calls, follow-up emails, and more!
Here’s an example of a ‘triggered’ rule that automatically creates a phone call task if a lead opened an email twice but did not reply:
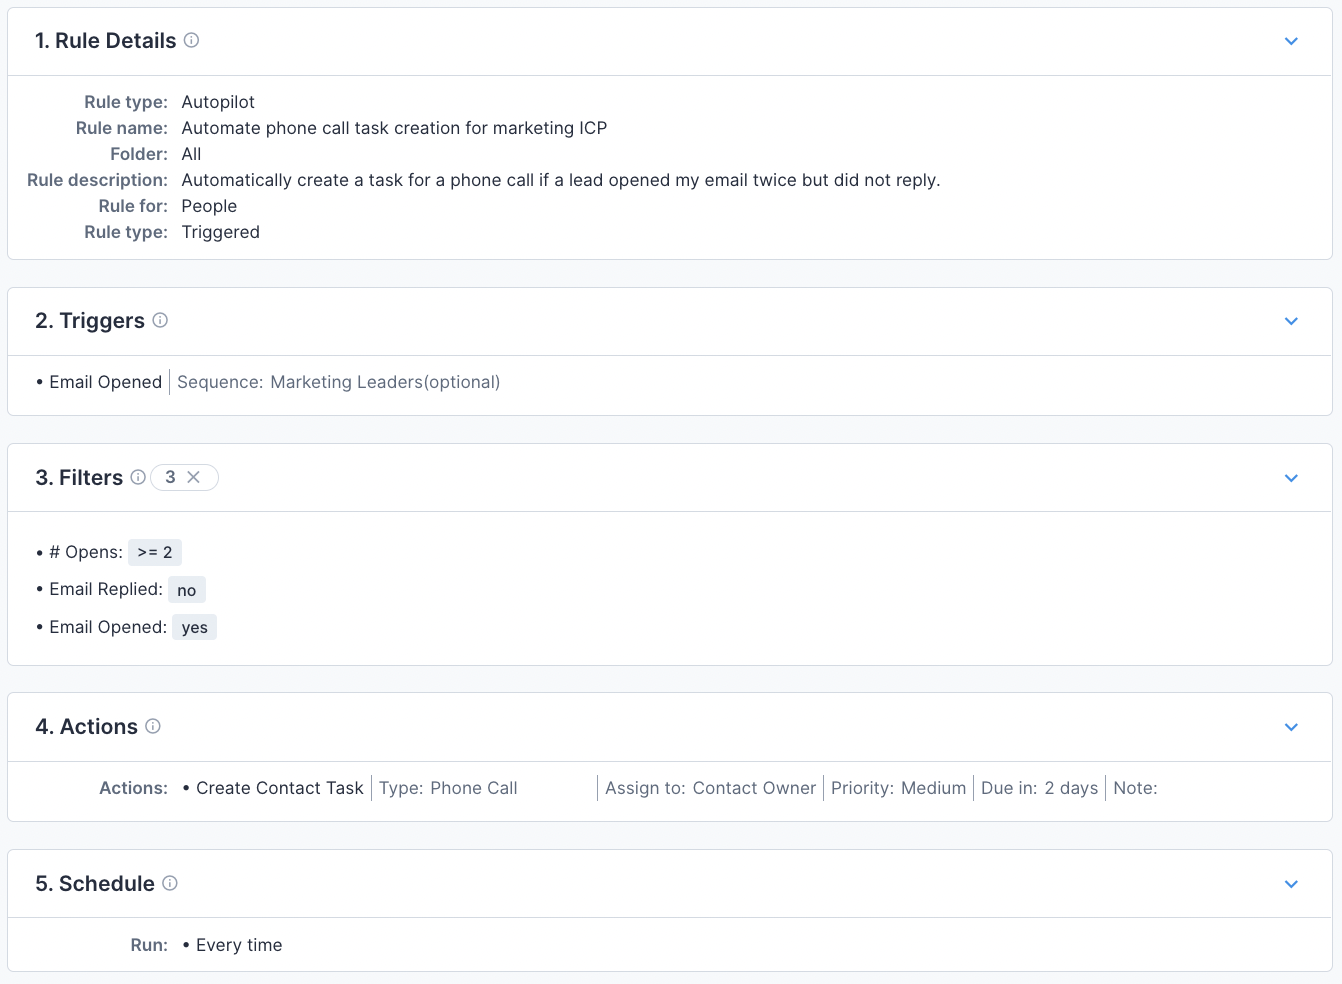
With task-generating rules, sales leaders can make sure that interested leads are being nurtured properly and are never getting missed or overlooked.
#3: Keep your lead lists stocked with list-building rules
The most efficient salespeople have strong lead lists, filled with best-fit prospects who match their ICP and are ready to enter your sales pipeline.
To do this you can create a batched rule that automatically adds new leads that enter the Apollo database (and match your filter criteria) directly into your saved lead lists!
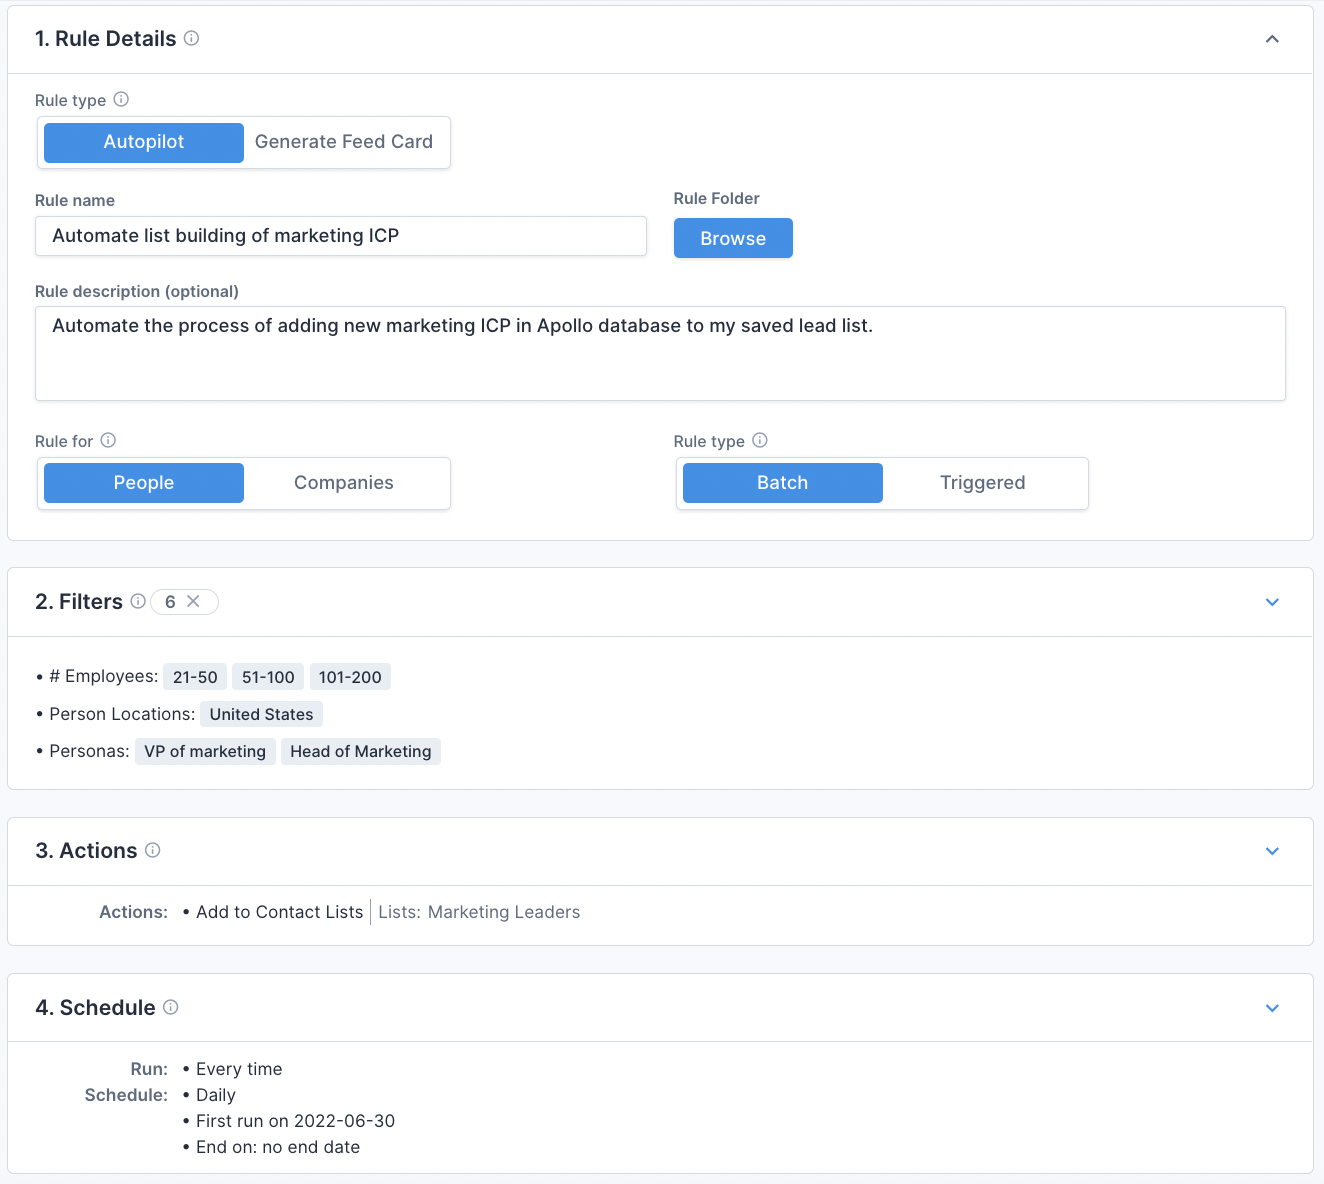
To create this rule, add the specific filters that describe your ICP, set your action to “add to contact/account lists, specify which list(s) you want leads added into, and choose your desired scheduling.
#4: Streamline engagement by automatically adding contacts to sequences
Rules Engine gives you infinite ways to automate engagement. One of those ways is building out rules to automatically add prospects into your Apollo Sequences.
Here is an example of a ‘triggered’ rule that adds contacts to the sequence ‘Marketing Leaders’ every time a new contact is created in a marketing list:
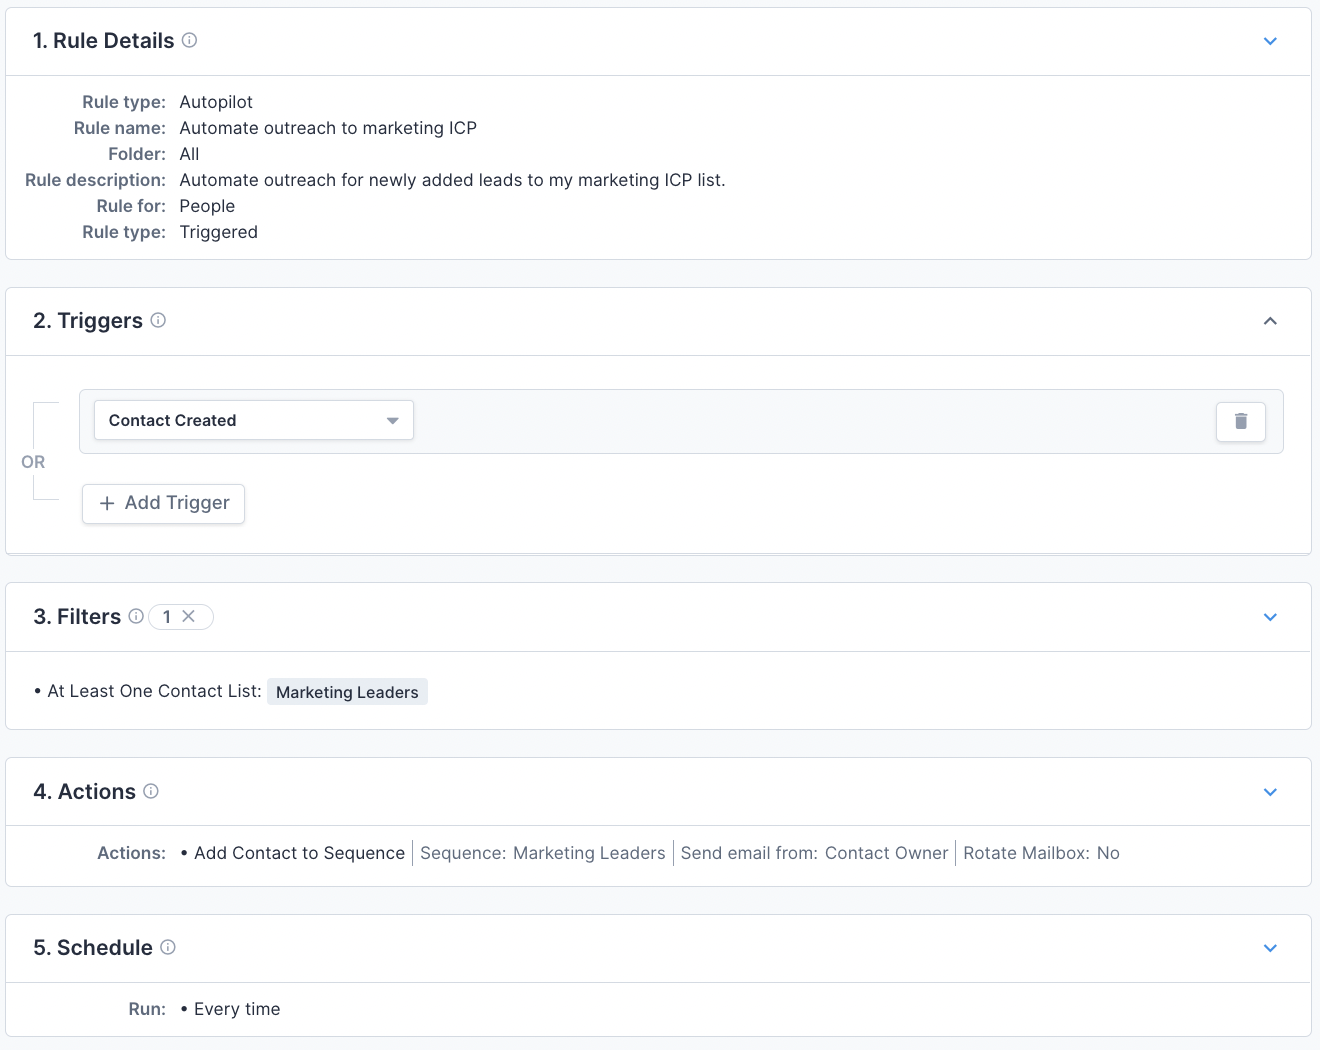
You could also send contacts into appropriate sequences using other triggers like email sent or call logged. A rule like this allows salespeople to engage with their leads in a personalized way, hands-free!
#5: Make adjustments and streamline workflows by tracking activities
Rules Engine doesn’t keep you in the dark. It stores a running list of all the actions carried out!
To view activities, click on any rule and simply select Show Activity. This will take you to a page that shows you exactly when and what was completed by the rule.
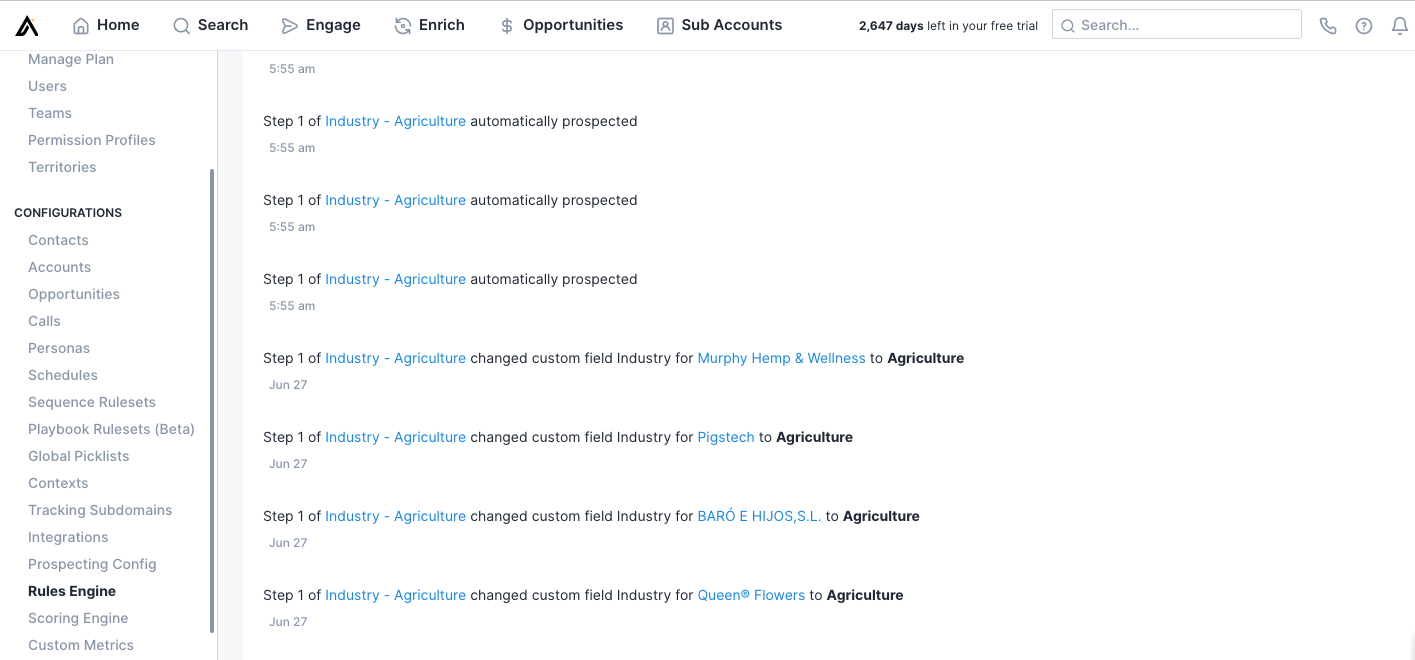
To get the most out of Rules Engine, check activities regularly to make sure your rules are performing exactly how you want them to. If not, it only takes a few clicks to head back to your rule settings and make data-driven adjustments.
#6: Increase organization and usability by using rule folders
If you’re managing hundreds (or thousands!) of accounts, your team could create a lot of rules. That’s why folders are so important. They keep your rulesets usable and easy to manage.
You could create folders dedicated to rules for inbound leads, outbound leads, specific industries or company sizes, specific stages of the funnel, funding rounds, certain buyer personas; anything that keeps your rules stay systematic and organized!
With everything in its place, admins can enter Rules Engine and browse according to folders and sort through Apollo rules with ease and efficiency.
Note: To change a rule’s folder, simply click on the rule and, in the “Rules Details’ ‘ section, you can browse and select your new folder.
Ready to give Rules Engine a try yourself? Upgrade to a paid Apollo plan and start building out your perfect processes in Rules Engine today!

